How to install Windows 10 from Flash Drive?

Windows 10 is a Operating System developed by Microsoft Corporation. This is world's one of the most popular OS. This is a Commercial Software, which means you need License to use the product. As you have license and the installable .iso file, now make it ready-to-use on your PC. To create a Windows 10 bootable USB flash drive, you need a blank USB flash drive with at least 8GB of space or blank DVD (and DVD burner) if you want to create media. We recommend using a blank USB or blank DVD, because any content on it will be deleted. On Windows 10, you can use the
- 1.1 Microsoft Media Creation Tool to download the files onto a removable drive with support for both firmware types (UEFI and legacy BIOS). Or
- 1.2 You can use Rufus, a third-party tool that makes it easy to create a flash drive to install Windows with support for UEFI.
1.1) Create Windows 10 bootable Flash Drive with Media Creation Tool
Media Creation Tool is the best option available for creating a bootable USB media to perform an in-place upgrade or clean installation of Windows 10. First connect a flash drive of at least 8GB of space, and then use these steps:
Windows 10 download page: https://www.microsoft.com/en-us/software-download/windows10
- Under the "Create Windows 10 installation media" section, click the Download tool now button to save the file.
- Double-click the .exe file to launch the setup.
- Click the Accept button to agree to the licensing terms.
- Select the "Create installation media (USB flash drive, DVD, or ISO file) for another PC" option.
- Clear the "Use the recommended options for this PC" option.
- Select the correct language, architecture, and edition of Windows 10 (if applicable).
- Select the USB flash drive option.
- Click the Next button
- Select the flash drive from the list. (If you do not see the device, click the "Refresh drive list" option.)
- Select USB flash drive option to create UEFI Windows 10 installer
- Click the Next button.
- Click the Finish button.
Once you complete the steps, the Media Creation Tool will download the files and will create a bootable USB flash drive that you can use to install Windows 10 on computers with support for UEFI and BIOS.
1.2) Create Windows 10 bootable Flash Drive with Rufus
- Official site: https://rufus.ie
- Microsoft Store URL: https://apps.microsoft.com/detail/9pc3h3v7q9ch
If the Media Creation Tool does not work or you do not want to use it, then you can try Rufus, a popular free third-party tool that allows you to create an installation media with support for UEFI devices.
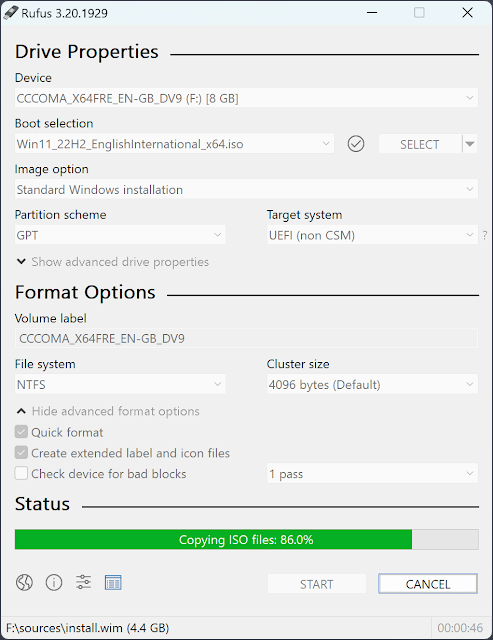
- Download, Install and Open Rufus
- Choose your Device from Device section.
- Show .iso file from Boot selection section.
- Type a name for Volume label.

- See the Screenshot from official Rufus website properly, and keep the exact same options everywhere.
- Leave the customization installation settings unchecked.
- Click on Start button
After 5 to 10 minutes, when it is 100%, the process will be completed.
3) Windows 10 system requirements
- Processor: 1 gigahertz (GHz) or faster processor or SoC
- RAM: 1 gigabyte (GB) for 32-bit or 2 GB for 64-bit
- Hard disk space: 16 GB for 32-bit OS or 20 GB for 64-bit OS
- Graphics card: DirectX 9 or later with WDDM 1.0 driver
- Display: 800 x 600
4) How to install Windows 10
Step 1 : Insert the bootable Flash Drive into the computer.
Step 2 : After turning on the PC quickly enter BIOS by pressing specific button mentioned below.
- Acer and Asus: F2 or Del
- Dell: F2 or F12
- Gigabyte: Delete
- HP: ESC or F10
- Lenovo: F1, F2, or Fn + F2
- Lenovo ThinkPads: Enter + F1
- MSI: DEL
- Microsoft Tablets: Press and hold the volume-up button
- Samsung and Toshiba: F2
- Sony: F1, F2, or F3
Select Next by after choosing Language and Time.
Step 7 : If it's a brand new HardDisk, System will show Unallocated Space. In this case, select this Unallocated Space and click on New. Take as much space as you need (let's say 100 GB) and click on Create to create Drive. Rest of the Hard Drive space will show as another Unallocated Space, then we will leave it like that, and install Windows and then create other Drives from My Computer later.
If it's a old or used HardDisk (by you or someone else). In case where there is a lot of information; Select and delete C Drive. Then it will convert into Unallocated Space. Then select this Unallocated Space and click on New. With everything (or as much space as needed) click on Create to create Drive.
Note that if you leave some space, it will be shown as a different Unallocated Space, then if you want to create Drive, select this new Unallocated Space, click on New, take all the space and click on Create to create Drive. Or then install Windows and then create other Drives from My Computer later.
Anyway, the process will start only after selecting the specific drive i.e. C Drive and clicking on Next.
Step 8 : When the Windows Installation process is completed, the Username must be given, and then the Password.
Step 9 : Type your Windows product key.
Step 10 : On next screen, choose User recommended settings.
Step 11 : Choose the Home Network for Internet use at home.
Congratulations! You are Done.
5) How to create Drives?
When the Windows Installation process is completed, right click on My Computer from the desktop and click on Manage and go to Disk Management. Right click on Unallocated Space and click on New Single Volume. Determine the specific space for a drive there and click on Next with Drive Letter and click on Next. After that
- NTFS, Default
- Preferred name in Volume Label
- Choose Quick Format, then Next.
Note, if you want to delete a drive, right click on the drive and select Delete Volume, it will become Unallocated Space.


